This is a cool movie about the cars that film the cars.
How they film cars
Reply

This is a cool movie about the cars that film the cars.
I have been working on the Penobscot we bought last summer in the basement. Actually, I just started this week. Most of the work is going to be refinishing the wood seats. In the past I have gone the usual route and used a palm sander and a pile of sandpaper. This time I am going old school.
Card scrapers are nothing more then a sheet of metal with a burr on the end. It is what they use before sandpaper was invented. They aren't expensive, a set of different shapes and a burnisher to sharpen them will cost you well under $50. The best part is that they can replace all the course and medium sandpaper you use.
In the canoe work most of wood is covered with old varnish which can clog sandpaper quickly. A scraper just scrapes of off.
Working in the basement they are wonderful. There is no sander noise to wake the kids up at night. Dust isn't flying everywhere and there are no discarded sheets of sandpaper all over. Sharpening has taken some trial and error, but in a evening I started to get the hang of it.
Here are some of the videos and articles that helped me out:
From Fine Woodworking #147
Fine Woodworking Video
The DoveTail Kid
For some reason, my mom's “Fudge Nut Bars” have stuck in my memory, though she hasn't made them in YEARS. 2 years ago I asked her for the recipe, and she sent it to me. I was fun to learn that it came from my middle school home-ec teacher in 1984: she must have gotten it when my oldest brothers were at good-old Wylie. I didn't make the cookies until now because they make an 11×14 pan of deliciousness. Yipes, thats a lot of cookies. But this weekend I had an excuse: the 8th annual Euchre for Toques party. They were well received. A good thing to keep in mind when you need a whole mess of easy treats but want something a little different than a drop cookie. I made a few modifications. I think next time I'll try only 1 1/2 c. brown sugar, but 1 3/4 definitely works well!Fudge Nut Bars
Filling:
12 oz chocolate chips, or bitter sweet chocolate, chopped
1 T. cocoa (optional)
14 oz can sweetened condensed milk (previously listed as 1 cup)
2 T butter
1/2 t salt
Cookie:
14 T butter
1 3/4 C Brown Sugar
2 eggs
2t vanilla
2-1/2 C Flour
3 C oatmeal
3/4 t soda
1 t salt
1C chopped nuts (walnuts are ideal), optional
Preheat oven to 325.
Filling: Melt all ingredients, set aside to cool.
Cookie: Beat butter and brown sugar until light and fluffy, aprox. 3 min. Add eggs, 1 at a time, and vanilla. Separately, mix flour (I used whole wheat), oats, soda and salt. Mix into butter mixture. Press 2/3 of cookie mixture into a large 11 x 14″ greased pan. Pour chocolate mixture over. Add nuts to the remaining cookie mixture and crumble on top of chocolate. Bake 20-25 min. until golden.
Cut once cooled. I like to cut them into 2″ squares, or a little smaller, then cut in half on the diagonal. Yes, I have a thing for triangles.
I had been looking at bags like this and considered making some out of cordura, tyvek, or canvas. The day after Bridit and I talked about making some, I saw them on Steep And Cheap for about $30 and got two. They swallow gear. Two take up 75% of the width of the Vibe leaving about 10″ on and they come up to the top of the seat backs.
The bags are of heavy cordura and lined with yellow ripstop. The lining has pockets around the outside which make nice places for tucking small things and the light color also makes it easier to find things in the cavernous bag. The bottom is hard rubber which adds weight, but it makes a bombproof bottom that can be set down outside without worrying about getting the contents or bag wet/dirty. I would like stiffer sides; it would make packing easier but storage more difficult. Three of the top edges unzip to form a lid that is a large pocket. The the rubber coated semi-transparent lid makes the pocket on contents easy to see.
There are handles on all four sides so grabbing the bag is easy no matter which way you attack it. The main straps work OK as backpack straps for longer carries.
We took them on a ski trip to the UP and had no shortage of space. Winter sports require so much stuff, but it all fit. One held ski gear; fleece, shells, gloves, socks, long underwear, wax, boot driers, helmets, and goggles all disappeared into the bag. One the way home I added a pillow and blanket. The bag still wasn't full. The other held clothes for three of us with plenty of space to spare. If I was traveling solo on a ski trip, one bag could carry all my stuff including ski boots and helmet.
Pros: Tons of space, Nice lining, durable, rubber bottom
Cons: Soft sides make loading and unloading a pain.
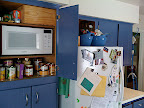
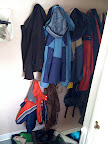
Sometimes it is hard to get anything done around the house. This past few weeks have been productive. Eli has gotten to the point where he can help out. We made a set of coat hooks for short people. I replaced the old toilet seat with a nice new one. I even found a cheap one that is 100% recycled wood and made with an “eco friendly processes.” This weekend Bridgit and I moved the microwave form the counter to the pantry. It is nice having the extra counter space. Other tasks have been to fix a couple shelves in the lower kitchen cabinets, add more wine capacity in the basement, and put some grip tape on the side entry threshold.
Last night I changed the oil and rotated the tires on the Caviler and Eli got to help with the lugnuts. He sometimes needs to be told more then once not to play with tools. While I worked on the car, he worked on moving all the tools he could reach from the garage to the driveway, but when asked, he cleaned them up. Unfortunately, now I am going to have to hunt for them because most of the tools ended up in different homes.
Ski season is drawing to a close and Eli also had fun helping me with ski maintenance. He watched me apply wax and then helped scrape. He now associates any wax with skis: he saw a candle gingerbread man at my mother's house and asked to eat it. Bridgit told him that it was made of wax and he told her that he wanted to put it on my skis.
Years ago tire manufactures came out with “all season” tires and told everyone that they now could have one tire that would do it all. The problem with that is you end up with one tire that does everything OK, but nothing well.
I have already covered why and how I got what tire as well as initial impressions here. Now we get into how they have worked out.
We have had a good snow year and it was a good idea to get winter tires. We are avoiding putting many dry miles on them to save wear. That is the one advantage of having one care with and one without snow tires. The tires have performed well.
Over MLK weekend we drove up to the UP for some skiing and family visiting. Almost 1000 miles total were traveled during the trip. Most of the trip up was clear until we got into the UP. We spent a couple hours on roads that were covered with packed snow and cruised along. The tires handled great and were in their element. About a foot of snow fell while we were in town. They didn't seem to like the brown slushy crud that develops on the roads. They had some initial slip that was easily mitigated by starting in second gear. In fresh powder and hard pack there was no problem at all.
At highway speeds with crosswinds the car got blown around a bit and the squidgy-ness of the tires made counteracting the wind wobbly. Another thing I found was that crossing the bridge being in the left (center) lanes was a bad idea. On the Mighty Mac the center lanes are metal grate and the snow tires got pushed around as they sunk into the holes. This usually isn't a deal, but was something that I had never thought about.
Also so far gas mileage hasn't been affected much. The first tank on the trip had quite a bit of warming up. One that was all traveling we got great mileage, 36.49 mpg.
It's mid Febuary now and soon it will be time to take them off. Supposedly they wear really quick above 45 degrees Fahrenheit.